When it comes to riding, every route is not created equal. In order to help riders get the most out of their time on the bike, we have created a whole new way to build rides in the REVER app.
Upon first open of the app, at the top of the Track tab, you may notice the big Create Ride bar has evolved into a smaller Create Ride. After the second app launch, it will compress into a black curvy route icon.
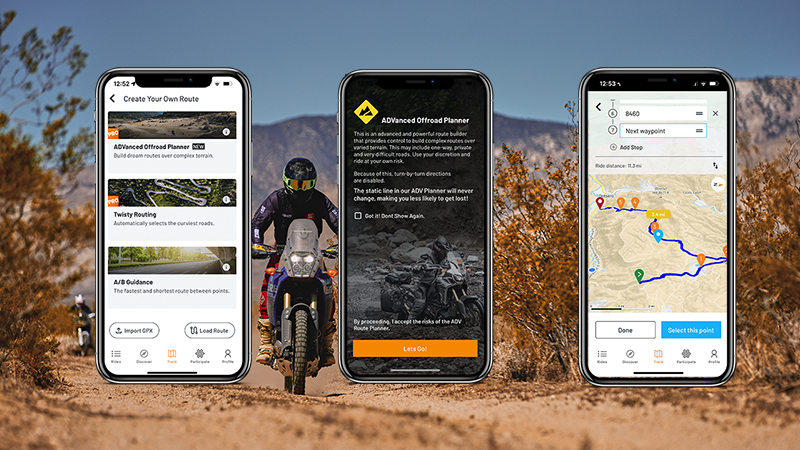
Once you click into the Create Ride flow, you will notice three planning options: the new ADVanced Off-Road Planner, Twisty Routing and Simple A-to-B Routing. For users that have experience planning in REVER, Simple A-to-B Routing is going to be what you have worked with before. The Twisty Routing was previously a selection underneath the standard planner, but now it is elevated to help get users the curviest route between points. The new option is the ADVanced Off-Road Planner, this is where you can really build some complex routes over a variety of terrain. So let’s get into the nitty-gritty of what each one offers and will be used for.
ADVanced Off-Road Planner
The new ADVanced Off-Road Planner goes beyond the ordinary ride planner. With the ADVanced Off-Road Planner, you can build complex routes over diverse terrain to help you get lost, but keep you on track.

This is NOT the ride planner to get you to your local Lowe’s, this is used to build complex routes over various terrain. Once you enter into the ADVanced Off-Road Planner, you will zoom and pan around to place points on the map. Depending on the terrain or roads you are planning on, you will need to place subsequent waypoints within a given radius to piece together the route. If there are many roads and trails, you will need to place the points closer together to further guide this route builder as the track line will have a challenging time deciding between which road. If there are sharp corners linking together two points, you may need to place a point in the apex of the turn.
With this not being a standard route algorithm, it is basically pulling together roads on the map style and linking it together with your waypoints to build routes, similar to a polyline tool that is snapping to the road. You will be limited to using 100 waypoints for this ride planner.
Due to the nature of routes being more complex, this is to be used with Follow The Route Line only. Turn-by-turn navigation is disabled for any route built using this planner as it will not properly recognize the route you are trying to ride.
For Best Results
- Keep waypoints less than 7 miles from one another
- Be consistent with point spacing
- Place waypoints in sharp corners (hit your apexes)
Twisty Routing
For the asphalt-carving enthusiasts, we have our signature Twisty Roads algorithm. If this hits home, you can search addresses or GPS coordinates and plot points along paved roads, then REVER’s Twisty Roads algorithm will kick out the twistiest route between your points. If you are plotting points to guide the route, ensure that you place the point precisely on the road for a better navigation experience. If you intend to add stops, make sure that you do place those off of the main road for the navigation to bring you there properly.
A-to-B Guidance
We say A to B, but you can add a C or a D or even E, if you really please! This is your standard efficient routing engine. This will allow you to place points or add addresses to build and guide routes for route line or turn-by-turn navigation purposes. If you are a legacy REVER user, this is exactly how the REVER in-app planner worked before with some minor user-interface changes.
Just as before, you can zoom and pan along the map to place points or enter addresses or GPS coordinates to guide your route or to make stops. Like I mentioned in the Twisty Routing above, if your points are guiding your route, please make sure you place them precisely on the road for the best navigation experience. If you tap the … icon, you will be able to Avoid Highways, Avoid Tolls and Avoid Ferries just as you could before. There is also an up and down arrow icon that will allow you to Reverse Route.
Once the route is set, you will have two options: Save For Later or Start. Previously, in order to start riding a route, you had to go through the Ride Save Details, now we have this streamlined to get you off your phone and on the road quicker. Just tap Follow Route Line or Turn-By-Turn Directions.
Additional Changes On This Release
- Skip The Ride Save, Hit The Road
- As you complete your ride planning, you can hit Start and skip the ride save screen and get on the road quicker!
- Improved the ride planning flow
- The ride planning user experience has been refined with less screens and stronger clarity on waypoint placement and purpose.
- Enhanced multiple waypoint management
- The user interface with managing waypoints has been improved so you can rearrange and add waypoints easier.


.avif)


